Pages

Sunday, May 31, 2015

Common Orchids Pests : Sap Feeding Insects : Spider Mites

Spider Mites on Orchids
Symptoms:
Mites are not insects, they are members of the arachnid family. Mites typically feed on the underside of the leaves and can be found under the leaves as small, red to brown pests. A hand lens may be needed to see them. Leaf undersides may have webbing and brown splotches from the mite excrement. The upper surface of a damaged leaf may have a silvery sheen that eventually becomes sunken and turns brown. Leaves may be streaked, stippled or spotted due to lack of chlorophyll.

Spider Mites on Orchids

Treatment:
Plants can be sprayed with a miticide like Kelthane following label instructions being particularly careful to contact all the undersides of the leaves. During warm weather, new generations mature every 6 days so repeat applications will be required, perhaps 3 applications at 4 day intervals.

Prevention:

Mites appear during warm, dry weather. Increasing humidity and leaf wetness and, if possible, decreasing temperature help prevent infestations.

Saturday, May 30, 2015

Common Orchids Pests : Sap Feeding Insects : Whiteflies

Whiteflies
Symptoms: 
Whiteflies are small, moth-like insects that attack buds, flowers and new growth. The tell tale sign of whiteflies is a cloud of tiny white insects arising from an affected plant when it is moved or disturbed.

Whiteflies on Orchids
Treatment: 
Plants can be sprayed with Malathion, Orthene or Safer Soap following label instructions. Repeat applications at 4 day intervals until whiteflies are no longer present.


Control: 
Good sanitation and elimination of weeds will help prevent infestation as will keeping plant hosts separate from your orchids.

Common Orchids Pests : Sap Feeding Insects : Thrips

Thrips
Symptoms: 
Thrips are very small sucking insects that feed on flowers and occasionally leaves and can transmit disease from plant to plant. Infested buds may not open and flowers may be deformed exhibiting water soaked spots. Leaves may appear pitted, stippled, silvery or bleached.

Symptom Thrips on Orchids
Treatment: 
Plants and flowers can be sprayed with a pesticide like Orthene,
Malathion or Safer Soap, applied in accordance with label instructions. Repeat applications will be required because thrips remain hidden on the plant or can be reintroduced to the plant from other flowers in the landscape.

Control: 
 Good sanitation will help prevent infestation as will keeping plant hosts (flowers, citrus, gardenias, eucalyptus, etc.) separate from your orchids

Common Orchids Pests : Sap Feeding Insects : Aphids


Symptoms: 
Aphids are sucking insects that attack buds, flowers and new growths and transmit disease from plant to plant. Buds and flower may fail to open and leaves may have a sticky deposit.

Treatment: 
Wash aphids away from the plant with a jet of water. Plants can be sprayed with a pesticide like Malathion, Orthene or Safer Soap using the product in accordance with label instructions.

Miscellaneous: 
The honeydew excreted by aphids and other sucking insects is attractive to ants and is an ideal medium for sooty mold. When sooty mold is present, inspect the plants for aphids, mealybugs, scale and mites.

Common Orchids Pests : Sap Feeding Insects : Mealybugs

Mealybug on orchid

Symptoms: 
Mealybugs are sucking insects that attack any part of the plant but tend to stay tucked away at the junction of leaf and stem. Severe infestations cause chlorotic areas to appear on the leaves, which may darken, causing the leaf to yellow and drop prematurely.

Treatment: 
If there are only a few mealybugs, use a Q tip dipped in isopropyl alcohol or toothbrush dipped in a pesticide like Malathion, Orthene or Safer Soap (used per label instructions) to physically remove the mealybugs. For more severe infestations, apply the pesticide and repeat the application 2 weeks later. Be sure to spray all plant surfaces, particularly the undersides of leaves and leaf axils.

Prevention: 
Remove old leaf and flower sheaths to eliminate hiding places and allow easy inspection. Check new plants carefully before adding to the growing area.

Common Orchids Pests : Sap Feeding Insects : Scale

Scale on Orchids

Symptoms:
Scale are sucking insects that attach to and feed on the underside of leaves, in leaf axils, on pseudobulbs and on rhizomes. They often are hidden under old leaves and pseudobulb sheaths. Severe infestations cause chlorotic areas to appear on the leaves and plant surfaces which will yellow and may darken and can cause the leaf to drop prematurely.

Treatment:
If there are only a few scale, use a Q tip dipped in isopropyl alcohol or toothbrush dipped in a pesticide like Malathion, Orthene or Safer Soap (used per label instructions) to physically remove scale. For more severe infestations, apply the pesticide at the crawler stage and repeat the application 2 weeks later. Be sure to spray all plant surfaces, particularly the undersides of leaves and leaf axils. 

Prevention: 
Remove old leaf and flower sheaths to eliminate scale hiding places and allow easy inspection. Check new plants carefully before adding to the growing area.

Wednesday, May 27, 2015

Popular Home Grow Orchid : Phalaenopsis

MOTH ORCHID is an appropriate common name for the genus Phalaenopsis, bringing to mind night in a distant, tropical jungle, the darkness broken only by a cloud of white flowers fluttering in the warm breeze. Phalaenopsis spesies have distribution from Himalayas of northern India, Tibet and China, down through Southeast Asia and into the island countries of Malaysia, Indonesia and the Philippines. Northern Australia and New Guinea.

Phalaepnosis Amabilis

GENERAL CHARACTERISTIC
All phalaenopsis, whatever their flowering habit, have a number of characteristics in common. While the flower size, color and thickness of segments can vary tremendously, the flower structure of phalaenopsis does not. Unlike Paphiopedilum flowers, where the smaller, lateral sepals fuse to form the ventral sepal which counterbalances the larger, dorsal sepal, the three sepals of a typical Phalaenopsis flower arc nearly identical in size and evenly spread apart, forming a triangle of sorts. The lateral sepals may vary in coloration from the dorsal sepal, as is the case with Phalaenopsis stuartiana. Here the lateral sepals arc spotted heavily in brown while the dorsal sepal is only lightly speckled in pink at the base. The two petals of any Phalaenopsis flower, on either side of the dorsal sepal, can be larger or about the same size as the sepals, often "filling in" the space between the lateral sepals and dorsal sepal.
Though largely unappreciated, the Phalaenopsis lip or labellum is the most complex segment of the flower. Positioned between the two lateral sepals, the Phalaenopsis lip has three sections, or lobes. The two side-lobes are usually raised at an angle to the central or front lobe. The front-lobe, typically to some degree spade-shaped, juts forward or somewhat downward. Phalaenopsis stuartiana has a front-lobe with two tail-like appendages called cirrhi, a characteristic for its section of the genus though not for all Phalaenopsis species. At the junction of the three lobes of a Phalaenopsis lip is a raised area called the lip-callus. It appears just below the nose-like protuberance which is the column, the fusion of male and female parts, in the center of a Phalaenopsis flower.
Phalaenopsis have a distinctive appearance. They are monopodial orchids with vegetation produced indefinitely from a single, apical growing point. This is in contrast to paphiopedilums, which arc sympodial and produce new growths from the base of the previously flowered growth. In theory phalaenopsis would continue to grow taller, year after year. Just the same, only rarely does one sec a phalaenopsis in cultivation much over 30 cm (1 foot) tall. The lowermost leaves tend to die after several years, and the plants are then often "topped", with the upper, leaved portion repotted in new mix. Like paphs, phalaenopsis form "fans" or "rosettes", with closely clustered leaves which emerge from the terminal growing point . These leaves are longer than they are wide, in cultivation usually between 20 and 30 cm (8-12 inches) long on mature plants, though the leaves of Phalaenopsis gigantea, for example, live up to their name, being up to 45 cm (1.5 feet) long in the wild. Like paphiopedilums, some phalaenopsis, such as Phalaenopsis stuartiana and Phalaenopsis schilleriana have attractive, mottled leaves, while Phalaenopsis amabilis displays solid green leaves. Even without mottling, Phalaenopsis leaves on a healthy plant present a glossy, pleasing appearance. Phalaenopsis roots, unlike those of paphiopedilums, often seek the open air and ramble out-of-pot. Their growing tips are greenish or reddish-brown, though away from the tip they are often whitish, even slivery in appearance when healthy. The inflorescences of phalaenopsis emerge successively along the stem between the axils of the leaves.

ORCHID'S BASIC CARE

An American Orchid Society demographic survey showed that phalaenopsis have become America’s favorite orchid. And no wonder. Perhaps no other orchid is better suited to home orchid growing. Plants with long-lasting sprays of lovely mothlike blooms in a broad array of colors are inexpensive and widely available, ready to give weeks of pleasure in your home or office. Simply provide modest light and  consistent moisture, and they will delight you with their relative ease of culture. The main flowering season is late winter into spring, though commercial growers today can make flowering phalaenopsis available year round.

LIGHT
Sufficient light is important for healthy growth and flower production. Provide bright light, no direct sun. In the home, an east, west or shaded south window. In a greenhouse, about 30 percent full sun. Under lights, four 40 watt fluorescent tubes and two 40 watt incandescent bulbs directly over plants. Foliage should be naturally semierect, and of a medium olive-green. Dark green, limp foliage indicates too little light.

TEMPERATURE
Mature plants need a 15 to 20 F difference between night and day. Provide nights of 60 to 65 F; days of 75 to 85 F. Seedlings need temperatures five to 10 degrees higher than mature plants.

WATER
Mature plants should seldom dry out between waterings. Seedlings need more constant attention to moisture.

HUMIDITY
Phalaenopsis need 60 to 70 percent humidity. In the home, place on trays of moistened pebbles. In greenhouse, use a humidifier if conditions are too dry.

FERTILIZER
Must be provided on a regular basis because most potting media have little. Provide the exact fertilizer you use will depend on the mix in which your plant is growing. A good general rule is to use a balanced (10-10-10, 12-12-12 or similar ratio) fertilizer “weakly, weekly.” That is, fertilize every week at one quarter to one half of the recommended dilution.

POTTING
Should be done every one to two years before the mix breaks down too far. Best done in late spring after main flowering season, using a well-drained but water-retentive mix. Select pot size for root mass, not top size.


Tuesday, May 26, 2015

Types Of Hydrangea : Climbing Hydrangea

Decumaria barbara
Climbing Hydrangeas included in this group are Decumaria barbaraHydrangea anomola subsp. petiolaris and Schizophrama hydrangeioides. These are all vines which climb using aerial roots to attach to the outer surface of walls, rocks, tree trunks or wooden structures like pergolas. Unlike English Ivy they rarely become a problem on trees. Climbing hydrangeas only bloom on vertical stems – vines growing on the ground will not bloom. Minimal pruning is required. They bear lacecap inflorescences with an outer ring of showy white sterile florets around creamy to yellow fertile flowers in late spring. Deadheading can be done right after flowering to save energy and for aesthetics by cutting the inflorescences off above the first leaf. Branches that extend out far from the climbing surface may also be pruned back in summer after flowering to prevent the plants from being pulled from their structures by heavy winds, ice or snow. Climbing hydrangea vines will grow well throughout Virginia in moist shady sites. In cooler parts of the State they can take more sun as long as they receive adequate moisture during the summer. after flowering to prevent the plants from being pulled off by heavy winds, ice or snow loads.

Decumaria

Decumaria barbara

Woodvamp (Decumaria) is a genus of two species of flowering plants in the family Hydrangeaceae, one (D. barbara) native to the southeastern United States, and the other (D. sinensis) native to central China.
They are shrubby lianas growing to 4-10 m high through shrubs and trees, climbing by means of aerial adhesive rootlets. The leaves are variably deciduous to evergreen (with D. barbara tending to be more often deciduous, D. sinensis more evergreen), 3-10 cm long, ovate with an acute apex, and a smooth to obscurely toothed margin. The flowers are 5-10 mm diameter, white to creamy colored, fragrant, produced in dense panicles 3-8 cm broad. The fruit is a dry capsule containing several seeds.

Decumaria sinensis

Hydrangea : Basic Care

Hydrangea macrophylla is a species of flowering plant in the family Hydrangeaceae, native to China and Japan. It is a deciduous shrub growing to 2 m (7 ft) tall by 2.5 m (8 ft) broad with large heads of pink or blue flowers in summer and autumn. Common names include big leaf hydrangea, French hydrangea, lacecap hydrangea, mophead hydrangea, penny mac and hortensia. It is widely cultivated in many parts of the world in many climates. It is not to be confused with H. aspera 'Macrophylla'.

Hydrangea

At a minimum, hydrangeas must be given weekly water. In hot summer months, their leaves quickly show signs of heat stress, but are easily revived with cooler temperatures or by misting their leaves. Hydrangeas usually do best in filtered shade, protected from hot southwest exposure, although they may grow luxuriously given full sun in cool, foggy coastal areas. In the winter, when the plants have dropped their leaves for dormancy, we prune hydrangeas for size control. Stems are pruned back to buds on strong growth, leaving stems about four feet tall; they can be pruned lower if there is a need for a more compact size, but they will produce fewer blooms the next season. Any dead or weak growth and old canes should be removed entirely, down to the plant’s crown, to encourage the renewal of strong new flowering stems. Be aware that hard renovation pruning can remove the next season’s flower buds, which form the year before. If buds are not removed, hydrangeas will bloom from July to November, on the ends of new growth. Regular fertilization can greatly enhance the summer display; Filoli gardeners apply a general fertilizer, such as 10-10-10, in the fall to encourage root growth, and in the spring when the plants break dormancy.

Hydrangea

Color Play
The color of hydrangea blossoms, which varies from white to pink, blue, and chartreuse, can be changed or enhanced by applying amendments that alter soil pH. Blue flowers are the product of acid soil in the range of 5.2-5.5; in November, 1/4 - 1/2 lb of aluminum sulfate around the base of large plants, and lightly cultivate it into the organic mulch at the base of each plant. Be aware that if aluminum sulfate is applied to white or pink hydrangeas, it will turn pink hydrangeas blue but have no effect on white blooms.

Dried Flowers
Another wonder of hydrangea blossoms is how beautifully they dry; people remove some choice blooms in late summer, into early fall, when the tiny, inconspicuous flowers are fully open and their texture changes from succulent to leathery. If they are too soft with moisture, the heads don’t hold their shape and color.

For drying, leaves are removed and flowers are left upright—or hung upside down for weak stems—in a warm, dry room. Once they are completely dry, they make colorful additions to arrangements later in the year when other flower selections are slim. During the winter holidays, people often use them to make wreaths and for decorating garlands and trees. Fresh flowers are also picked in season, conditioned in warm water and used in fresh arrangements throughout the house.

Reference : Hydrangea Care

Sunday, May 24, 2015

Kalanchoe Blossfeldiana : Basic Care

Kalanchoe blossfeldiana is one of the prettiest and famous representatives of the succulents family. Although it is easily cultivated all over the world, it originates from Magadascar while some creeping varieties were found the rain forests of Brazil and Southeast Asia. The name kalanchoe came from a Chinese word but it is still unknown how and when it was given to the plant.
 
Kalanchoe blossfeldiana
 
The original colors of the kalachoe were orange and red. It grew rather tall and was not too much adapted as a potted plant for the consumer. The big breakthrough was about 1980 when Danish and Dutch growers managed to create the current plant, a variety with compact shape, rich foliage, sturdy stems and plenty of flowers. Plant breeders developed a variety of colors: yellow, orange, pink, purple, white and just recently bi-colored varieties.

The plant is very popular with consumers because of its long lasting flowers and attractive foliage It normally blooms during the short days of winters and has become a popular plant from late fall to late winter. Kalanchoe's leaves are fleshy, wide, oval-shaped, with indented edges, appear in turn throughout the stems, are very tender and break easily.

Care
Kalanchoes are easy to grow, need warm temperatures and minimum care. In our moderate climate it can be as easily grown indoors and outdoors but only in pots and not in the ground. Temperatures between 60 F and 85 F are ideal for development and blooming of the plant. Kalanchoe is very sensitive to cold and it takes only a few hours of near 40 F for the plant to die. Avoid placing it near drafts or cool windowsills.

Their root system is extremely sensitive and it would be advisable to use clay pots that allow better aeration of the roots. Ensure excellent drainage by placing pebbles at the bottom of the pot and use light soil containing lots of peat moss, perlite and sand. Always empty excess water from the tray and never let your pot stand in water.

Kalanchoe plants love to be alone in small pots. However, the larger the pot the larger the leaves but the size of the top will hardly affect blooming or rate of growth. Avoid planting companion plants in the same pot with kalanchoes and repot each spring adding fresh soil. Kalanchoes grow rather slowly, its average height is 15-45cm while in older plants the stems become woody. 

This plant loves and needs plenty of light to grow, if light is adequate its leaves willdevelop a beautiful reddish outline. During summer do not allow direct sunlight because its leaves who contain lots of water will get sun-burned. Direct sunlight from fall till early spring will not harm your plant.

Provide plenty of water when the soil seems dry to the touch but do not overwater because the roots will rot. If you have the time, let the water sit for a while before watering so that it will get the temperature of the environment. Kalanchoes can stand dry conditions but do not let them dry out completely because it will greatly compromise its growth. The plant will need some time to get back into shape and avoid wetting the leaves when watering.

Kalanchoes are usually bought or given as a gift with flowers. So, when the flowers start to die back, cut them off and let the plant rest. After deadheading, you should reduce watering as the plant will need less water during this resting period. Soon you will notice new buds and your plant will bloom again. This change in blooming and resting cycles will go on throughout the year irrelevant to seasons.

You should however keep in mind that blooming of the plant is related to how much light the plant is allowed to have. Several hours in darkness will enhance flower production. In other words, if you keep the light (even artificial light) to 8-10 hours per day or less, you will help the plant produce new buds. Following bud formation you can bring the plant back to regular lighting.

Anyway, plenty of light will enhance overall growth but will reduce blooming. Kalanchoes tend to bloom more from fall till early spring the reason being that days are shorter during these months.

Kalanchoe in flower need only very little fertilizer. Generally the plants should have a good supply when you buy them in the store, so you should not need to worry for the first few months. If you want to keep your Kalanchoe past the first flower, start fertilizing only when you see new growth on the plant. Use standard pot plant fertilizer (like 20-8-20) once every second week at 1/4 to 1/2 of the recommended rate

Kalanchoes are resistant to disease and insects but if kept outdoors, could eventually be affected by aphids, scale, spider mites and nematodes. Common symptoms include apart from insects themselves on the crossing of the stems or the undersides of leaves, the presence of honeydew on leaves, creased faded leaves and webs, or leaves that look torn or bitten. Prefer non-toxic treatments because kalanchoes are very sensitive to certain ingredients used largely in insecticides widely used. If you decide to buy a chemical insecticide do tell the nursery that you are planning to use it on a kalanchoe plant.


Amaryllis : Basic Care

One of the largest and most reliable indoor flowering bulbs, Hollandia’s amaryllis will chase away winter gray with hot colors and enormous blooms. Children and adults delight in watching the sturdy stalks rocket to 30 or so inches, sometimes even blooming in just 21 days.

Amaryllis
About Your Bulbs
Hollandia selects top-grade amaryllis bulbs from the Netherlands and South Africa that are up to 36 centimeters wide to ensure strong and spectacular results. In this case, bigger is better because larger bulbs produce more flower scapes. Customers can chose from the amaryllis already started by our greenhouse staff or buy the bulbs and pot them up at home. Amaryllis can be planted from October until April and by staggering the planting time, flowering can extend well into the spring.

Planting and Growing Guide
Start with a clay or ceramic pot that is about two-inches wider in diameter than the bulb and at least as deep. A heavy pot (with a drainage hole) is needed so the plant does not topple over. At the bottom of the pot, put down a layer of gravel and then fill with a good potting mix. The bulb (pointed end up) should be halfway immersed in the soil. Water the bulb thoroughly after planting and put in a cool but sunny location. Amaryllis likes temperatures between 55 and 65 degrees. Water only when dry and feed twice a week with a liquid fertilizer. Buds should emerge in six to ten weeks. Stalks sometimes require staking, but if the pot is rotated regularly the plant should not lean too heavily in one direction. Flowers will last longer if the plant is removed from direct sunlight.

Aftercare
Amaryllis, if properly cared for, can be enjoyed for years. When flowers fade, cut them off but keep the leaves. Put the plant in a sunny window, water when dry, and feed with a slow-release fertilizer like Osmocote. Around July reduce watering to trigger dormancy. By late summer, cut off the yellow leaves and allow the pot to completely dry out. Store the pot in a cool dry room and do not water for two months. To wake it up, just repot the bulb, put in a sunny window and start watering again.

Forcing Amaryllis in Water

Start with one of Hollandia’s jars for forcing. They are both beautiful and functional. Fill the lower portion with water and set the bulb in the jar, adjusting the water level so it just touches the base of the bulb. Check daily and maintain the water level. Change the water completely when it gets cloudy. Set the bulb in a sunny and warm area and rotate occasionally to keep foliage from leaning in one direction. When buds start to color move the jar to a cooler location. Flowers will last longer there. To prevent the blooms from toppling, place three pieces of florist clay around the jar and press against both the sides of the bulb and the jar. Make sure the edges of the jar are dry so the clay will hold. Bulbs forced in water use most of their stored energy and will probably not rebloom so discard when done.

Azalea: Basic Care

Azaleas, called “The Royalty of Flowers” are of the Rhododendron family., a subspecies known as Tsutsusi, native to Japan. In East Texas and further east there is another subspecies called Pentanthera, the deciduous or wild native azalea. These are ly found in the acid soils of forests, although some nurseries have begun to stock them for sale. The Pentanthera azalea has a fragrance and a wider range of colors than the Tsutsusi.

Pink Azalea
Azaleas are not difficult to grow, even though they have earned the reputation as such. They fare better if a little planning goes into the planting. Azaleas should be planted in a semi shady spot, neither full sun nor dense shade. The filtered sun under pine trees is an ideal spot. Azaleas bloom more in bright light, and some varieties can stand more sun than others.

Planting azaleas in a raised bed helps them to thrive because they do not like “wet feet”. They should not be planted deeply. Spread out the root ball in a slightly indented spot in your prepared bed and pull the soil up over the root ball. Never plant lower in the ground than the plant has been placed in the pot. Water immediately after planting. Mulch the entire bed with pine straw, rotted pine bark or shredded oak leaves, about 1 inch deep around plant and 2-3 inches deep between the plants. If oak leaves are used, the mulch should be deeper. There are other mulches that can be used as long as they decompose quickly. Mulching controls weed, holds in moisture and helps lower soil temperature.

After azaleas are established, they do not require as much water as when they are first planted. Azaleas should be watered during the drier part of the summer. A soaker hose placed in the bed when the azaleas are planted is ideal. Azaleas will start to look a little wilted when they are very thirsty, however they will wilt before the ground dries out completely, warning you to give them water.

Azaleas demand a slightly acidic soil and they will die in alkaline soil. The ideal pH 4 to 5.5. It is important to take a soil sample and have the pH tested. If it is too alkaline your soil pH can be lowered by adding ammonium sulphate (not aluminum sulphate) to the soil. Never scratch around roots of azaleas, because their shallow roots may be damaged. Decomposed mulch can also lower the pH in your soil. Another good reason to mulch! After azaleas are established you may not need to fertilize heavily. I have found using water-soluble azalea fertilizer in a hose-end sprayer right after blooming works well. It gives them just enough “ boot” to get through the summer. Do not fertilize later than July, because it will stimulate new growth that will freeze more easily. If leaves on your plants start to turn yellow give them a dose of chelated iron. Use your hose-end sprayer with the recommended amount of liquid and spray foliage. They will green up in no time. This is a temporary solution however, so you may need to work on your soil pH. Yellow leaves also indicate an alkaline soil.

Larger azalea plants may start to look leggy. If you choose, you may prune them. You should do the pruning directly after spring bloom and never after July 1. They set buds for the next spring starting in July, and pruning later than this date will remove the next spring’s bloom. If your plant needs a lot of pruning, it is best to do some this year and complete the pruning next spring. Too much cutting back may shock the plant.

Azalea pest are not numerous. There are a few, such as lacewing, spider mites, and some foliar feeders. These can be controlled with acephate (Orthene) or Malathion. Almost all diseases are fungus related and can be alleviated with a fungicide.

Green Lacewing
Azaleas are often planted in spring when they are blooming, but fall planting allows them to be established during the winter rains. Nurseries sometime have them on sale in the fall. Give azaleas a little TLC and they will give you enjoyment of beauty for many years.

Reference : Azalea Basic Care

Orchid : Basic Care

Orchids make fabulous houseplants, and add elegance to any room. With a little care and the right conditions, orchids offer months & even years of enjoyment. Many types of orchids are easy to care for & can thrive in a home environment. The key to success is selecting the right orchid for the condition available. By following a few simple steps, your orchids will flourish & bloom.

LIGHT 
Each type of orchid prefers slightly different growing conditions, depending on how they grow in the wild. Some orchids, like the cattleya grow in the forest canopy & can tolerate a fair amount of light. Others grow closer to the forest floor & need lower light levels.
The amount of light needed can be classified in 3 ways.
1. Orchids needing high light can live in a south window, or a bright east or west facing window.
2. Medium light orchids will survive in an east or west exposure.
3. Orchids requiring low light will live in a bright north window, or a shaded east/west exposure.
Some orchids like the phalaenopsis do not like direct sunlight. A position slightly away from a window may be more suitable. Signs of sunburn may be limp leaves, yellowing leaves, or brown spots near the tips of the leaves. Signs that your orchid may not be receiving enough light may be; very dark green leaves, sparse or limp foliage.


HUMIDITY 
Orchids thrive in a humid environment. You can achieve this in your home by placing plants in groups and/or placing orchids on trays of gravel, partially filled with water. Take care that the pots are not sitting directly in the water.
Misting orchids with water will also improve the humidity around them. Keep in mind that the more misting a plant receives the less watering it will need. Misting should be done in the mornings only, so that the plants are dry by nightfall. This will help prevent any fungal diseases from occurring. (Only mist the leaves, and never the flowers).


FERTILIZING
When it comes to feeding orchids, they fall into two main categories. Monopodial, meaning the plant grows leaves from the top. And sympodial, meaning the orchid produces new growth next to the older one. For both categories of orchids we support the time-worn adage of feeding “weakly weekly.” Orchids are generally considered to be light feeders. So, when they are actively growing, fertilizer should be used at about a 1/4 their recommended strength for 3 successive waterings. The 4th should be a pure water rinse to flush out any soluble salts that have accumulated. Phalaenopsis fall into the first category (Monopodial) and prefer a balanced fertilizer like 20- 20-20 while the plant is actively growing. Other orchids such as; cattleyas, dendrobiums, oncidiums, odontoglossums, cymbidiums, miltonias, zygopetalums, and paphiopedilums fall into the sympodial category.

Begin fertilizing in the spring when new growth appears using a fertilizer such as Schultz Orchid Food 19-31-17. By mid-May to June, as the plants begin to really grow, move to a high-nitrogen formula such as Plant Prod 25-10-10. Do not fertilize while in bloom as this will shorten the life of the flowers. In late summer or early fall after blooms have faded,, switch back to the lownitrogen, high-phosphorus, and potassium formula (19-31-17). By October reduce fertilizer applications to once a month or less until spring.


PESTS & DISEASES
Prevention of disease & insect problems starts by keeping plants healthy through proper culture. Pay attention to light, nutrition, & moisture requirements. Avoid standing water on the leaves and make sure good air circulation is provided by maintaining space between individual plants. Do not allow plants to stand in water. Although orchids are relatively pest free, inspect plants on a regular basis for signs of scale, mealybug, aphids, & spider mites. Treat light infestations with Safer’s insecticidal soap according to label directions.


WATERING

Watering is the most important step in caring for your orchid. Too much or too little may affect your orchids health, and its ability to flower. The easiest way to water your orchid is to place it into the sink & soak the medium with water. Water the plant well, allow the water to drain from the bottom of the pot. Orchids don’t like to sit in excess water as it can cause root rot. Use room temperature water, as hot or cold water may shock them. It is also important not to get any water in the crown of the plant when watering.


Tip - Keep a wooden skewer down the side of your orchid pots. Check it periodically to see if your plant needs water. Each type of orchid prefers a different amount of water, and keep in mind that they will require more water in the summer months! Check the list on the left for specific watering care for your selected orchid.


RE-POTTING
Most orchids are epiphytic, they use trees trunks and branches to grow on. These orchids have aerial roots by which the plant takes up nutrients & water, therefore orchids grow best in a bark medium, which is very porous and well draining. Most orchids will benefit from repotting every 18-24 months. Repot plants into slightly larger pots in the spring or after blooming. Never repot an orchid that is in flower, or that has a new flower spike growing. In many cases this will cause the flowers to drop. Some orchids come potted in bark mixes, and some in sphagnum moss. Bark mixes contain, fir bark, coarse perlite, charcoal, and often some coarse peat. This type of mix is recommended as it won’t dry out as quickly and offers other benefits. There are fine and coarse grades available; check the label to find out which is best for your type of orchid. To begin repotting, remove all of the old media from around the roots of the plant. Using clean or sterilized scissors, cut off any rotten or broken roots. 

Tip - if a substantial number of roots have been removed, do not increase the pot size. Weak or old stems may be cut or pulled off of the plant at this time. Once the roots have been trimmed, place a handful of fresh bark in the bottom of the pot & spread the remaining roots over the bark. (Pre-soaking the bark in warm water before repotting is recommended). Gently fill in the rest of the pot with the bark, working it through the roots. Make sure that the junction between the roots & leaves is at the top of the medium. Keep your freshly repotted orchid in a shaded, but humid environment.Misting the leaves for the first few weeks will be beneficial until new root growth occurs.

Reference : Orchid Basic Care

Type of Orchids


Phalaenopsis
The ‘Moth orchid’ One of the easiest orchids to grow. Requires moderate-low light (keep out of direct sunlight). Allow potting medium to dry slightly between waterings. Ideal temperatures during growing period are day 24o- 29oC/ night 15o-21oC

Phalaenopsis

Paphiopedilum -- The ‘Lady Slipper’ orchid 
Requires low-moderate light (keep out of direct sunlight). Keep potting medium evenly moist. Warm days and cool nights in winter will help encourage flowering. Ideal temperatures during growing period are day 22o-28oC/night 18oC
Paphiopedilum

Cymbidiums
Requires moderate light & cool temperatures (day 24o-29oC). Place plants outside for the summer in semi shade. Temperature is the most critical factor in blooming cymbidiums. If they are too warm, they may not bloom. Leave the plants outside until late October or when temperatures drop to below 4oC. The cooler nights are needed to induce lowering. Bring inside & keep in a bright cool location. Keep moist in the summer, & water less in winter.


Cymbidiums

Odontoglossum
These orchids feature spectacular blooms in many shades. They prefer low to moderate light (avoid direct sunlight). Odontoglossums need an evenly moist medium, allow to dry slightly between waterings. Cooler temperatures are preferred day 18o-24oC/night 13o-18oC. To help induce flowering, place orchids outside in a semi-shaded area for the summer. Bring inside before any chance of frost. 
Odontoglossum


Zygopetalum 

Featuring fragrant flowers in shades of purple & green, with yellow & brown markings. These orchids prefer low to medium light with cooler temperatures (day 18o-24oC/night 16o-20oC). Keep medium evenly moist, allowing it to dry slightly between waterings. To initiate flowers place the plant outside in a shaded location & bring indoors before any chance of frost.


Zygopetalum

Dendrobiums
Beautiful orchids with long lasting flowers. They like a high light location & warm temperatures (18o-24oC). Allow pots to dry between watering. They like to be pot bound, so only repot when necessary.

Dendrobiums


Cattleya -- The ‘Corsage Orchid’ 
These orchids are forgiving plants to grow & can survive with a little neglect. They like high light & warm temperatures (day 18o-24oC/night 13oC). These orchids can tolerate drying out between waterings.

Cattleya

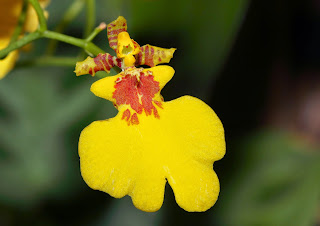
Oncidium & Miltonia
Both of these types of orchids are very easy to grow & have unique blooms. They prefer moderate indirect sunlight & warm temperatures (day 21o-27oC/night 16oC). A variation in night & day temperatures is needed for them to bloom. Keep plants evenly moist to keep leaves from shrivelling.

Oncidium

Miltonia

Reference : Orchids Basic Care

Adenium : Basic Care (part 2)

Adenium

WATERING: Adeniums, like all succulent plants, have the ability to store water. In their native habitat they live and grow only on the available rainfall, storing water in wet times to sustain them through drought. In extreme drought, even during the growing season, they can drop their leaves and become ‘drought dormant’, only to re-leaf with the first available moisture. These arid conditions do not adversely affect the plants other than to cause them to grow more slowly. This is a characteristic to be taken advantage of in cultivation. Adeniums can be left for long periods (the larger the plant, the longer the time) without the need to be watered and only suffer a setback in growth, but no adverse effect on the health of the plant. However, it is extremely important to realize that a container grown plant has its entire root mass confined to the pot, (unlike a plant in the ground that can actually grow roots in search of available soil moisture) and so is dependent on an outside source of water (YOU!) to survive and grow. On the other extreme is the nurseryman who maintains a watering schedule to keep the root zone constantly moist during the growing season so as to not lose any growing time or energy. The plant might be watered as often as several times a week or even every day, depending on the soil mix used. Adeniums, like most desert plants, respond to water and can grow many times faster in cultivation than in the wild, providing temperatures are high. Somewhere between nature and the nursery is the home growing situation. For general good growth and overall good appearance it is recommended to water regularly and to let the soil almost dry out in between waterings. The best way to decide when to water is to check the soil, with your finger, at about one to two inches deep. If it is almost dry, water; if it is not, wait until it is. There are several factors that will influence the timing here. Light plays a major role in determining how much water a plant uses. The more light a plant receives, the more water it needs. Related to light is temperature. Up to a point the higher the temperature, the higher the water use, although in extremely high temperatures most plants will actually slow down functions in an effort to conserve water. It is at these times that some containerized succulents are prone to rot if the soil moisture is too high. Adeniums are extremely heat tolerant, to at least 120°F, and usually do not have this problem. Another factor involved in determining water requirements of a plant is air movement. Most plants do best with good air circulation, but not a continual wind. The more air movement, the greater the water use. The length of time a plant has been in a specific pot size can also affect watering. As a plant grows in a given pot, it displaces soil for root mass. Since water is held in potting soil, the less soil there is, the less water there is available to the roots. Once the soil moisture is depleted, succulents begin to use stored moisture. If this condition persists, the plant will cease active growth. As a rule of thumb, if an Adenium is potted in a well drained soil mix and is in a properly sized pot and under proper light conditions, it should be watered anywhere from three times a week (6 inch pot) to every two weeks (20 inch or larger pot) during the peak of the growing season, tapering at both ends of the growing season. Unless the plant is to be grown through the winter (under greenhouse conditions only) it will require a minimum amount of water to maintain it through its dormancy. This is variable also, but for a dormant plant it will be from once a month (6 inch pot) to possibly not at all (20 inch or larger pot), again depending on the ambient conditions. If Adeniums are overwintered at nighttime temperatures of 50°F or less (either inside or outside) they should be kept bone dry regardless of the pot size. For all pot sizes regular watering should not be resumed until temperatures warm and the plant starts to show signs of growth or flowering. This normally occurs in the beginning of April (unless kept in a greenhouse in which case the resumption of growth and flowering will take place earlier depending on greenhouse temperatures). Any watering of a plant should provide a thorough drenching of the soil, with some amount of water draining through the pot, so as to wet the entire soil mass and to prevent salt buildup.


FERTILIZING: Under natural conditions plants utilize nutrients in the soil they grow in and to a limited degree will grow roots into ‘fresh’ soil when needed. In a container a plant can use up the available nutrients in a relatively short time. When these nutrients are depleted, growth slows and in the extreme will stop or become distorted. Also, nutrients are leached out of the soil with watering. Under ideal conditions (usually only achieved in the nursery) Adeniums can be fertilized with what amounts to a full strength application of a general purpose fertilizer every two weeks. Under most home conditions, and only if the plant is healthy, a half strength solution applied once a month during the growing season (April – October) of any available house plant food will be adequate.

Reference : Adenium Basic Care